- Home
- Blog
Elementor #4687
Perfect the Lash
False Eyelash Knowledge Hub
Mastering the four common lash extension grips is the difference between an average set and a flawless one. Whether you‘re a seasoned pro or just beginning your lash journey, the way you hold your tweezers—your lash extension grips—can make or break a set. Small adjustments in tweezer angle influence everything: the placement of each extension, your client’s comfort, and how long the lashes stay on. In this guide, we break down four foundational lash extension grips that belong in every lash artist‘s toolkit. Once you understand how to switch between these lash extension grips, you’ll adapt smoothly to different eye shapes, lash layers, and style requests—delivering consistent, beautiful results every time.
What Exactly Are These Lash Extension Grips?
Simply put, lash extension grips describe the angle and orientation of your tweezers‘ seam relative to the client’s face and your own body during application. That tiny detail affects how the extension lands on the natural lash, how much curl is preserved or created, and even how visible the lash base is to you as you work. A forced or overly tense lash extension grip can lead to hand fatigue, while a well-chosen angle gives you better control and a clearer sightline. That‘s why learning to shift between gripping methods isn’t just a technical trick—it‘s the foundation of safe, speedy, and precise lashing. I’ve personally found that the moment I stopped forcing one grip for everything, my speed jumped by nearly 30%.
The 4 Essential Lash Extension Grips Every Artist Needs
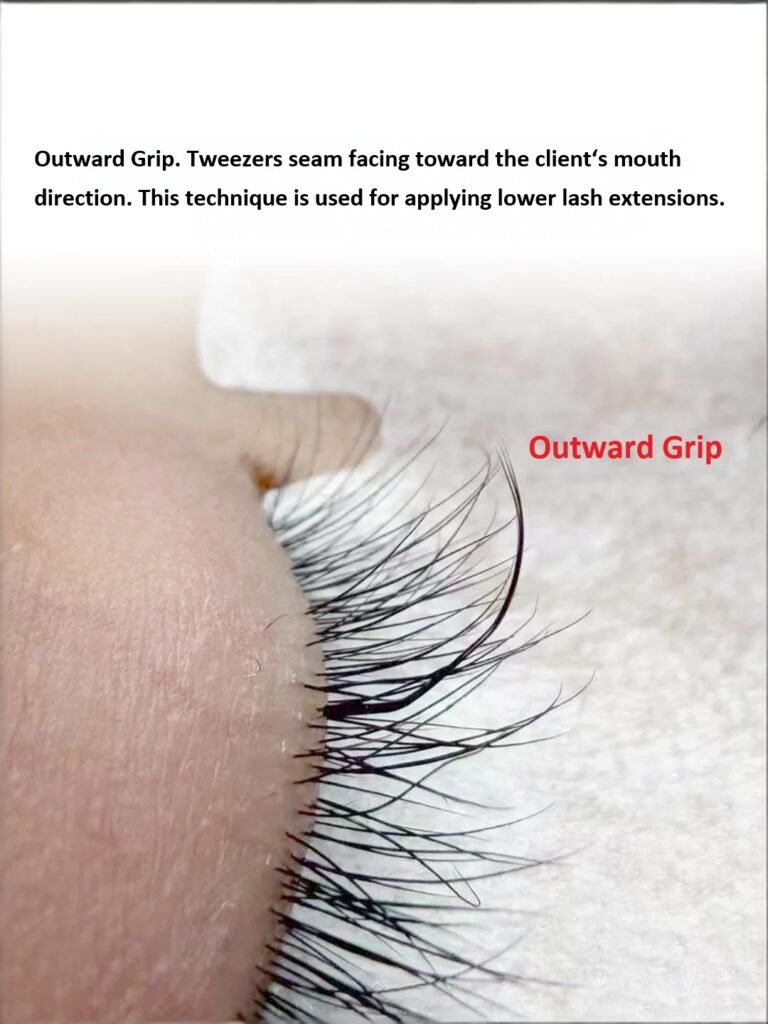
1. Outward Lash Extension Grip – The Go-To for Lower Lashes
In this lash extension grip, the tweezers seam points away from your body, toward the outer direction—roughly in line with the client‘s mouth. This outward-facing angle naturally opens up access to the lower lash line while keeping the tool away from the delicate under-eye area.
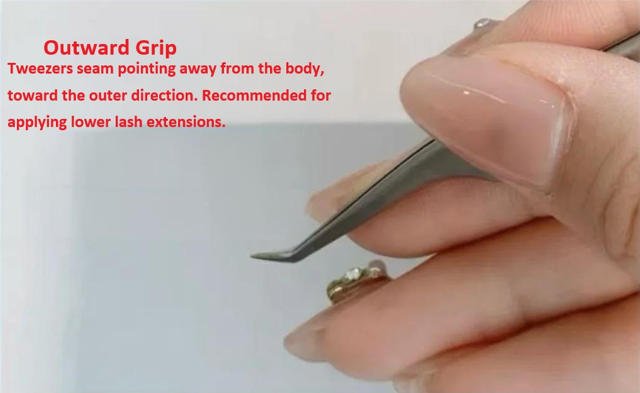
Why does this lash extension grip work so well for bottom lashes? The orientation lets you approach those fine, shorter hairs from an ergonomic position that reduces the risk of poking or disturbing the under-eye pads. You’ll also find it easier to isolate a single lower lash without bumping into neighboring hairs, which is key because lower lashes are thinner and more sensitive. Many artists (myself included) find that using this lash extension grip with a slightly lighter hand pressure prevents the tweezers from dragging the pad, maintaining client comfort throughout the service.
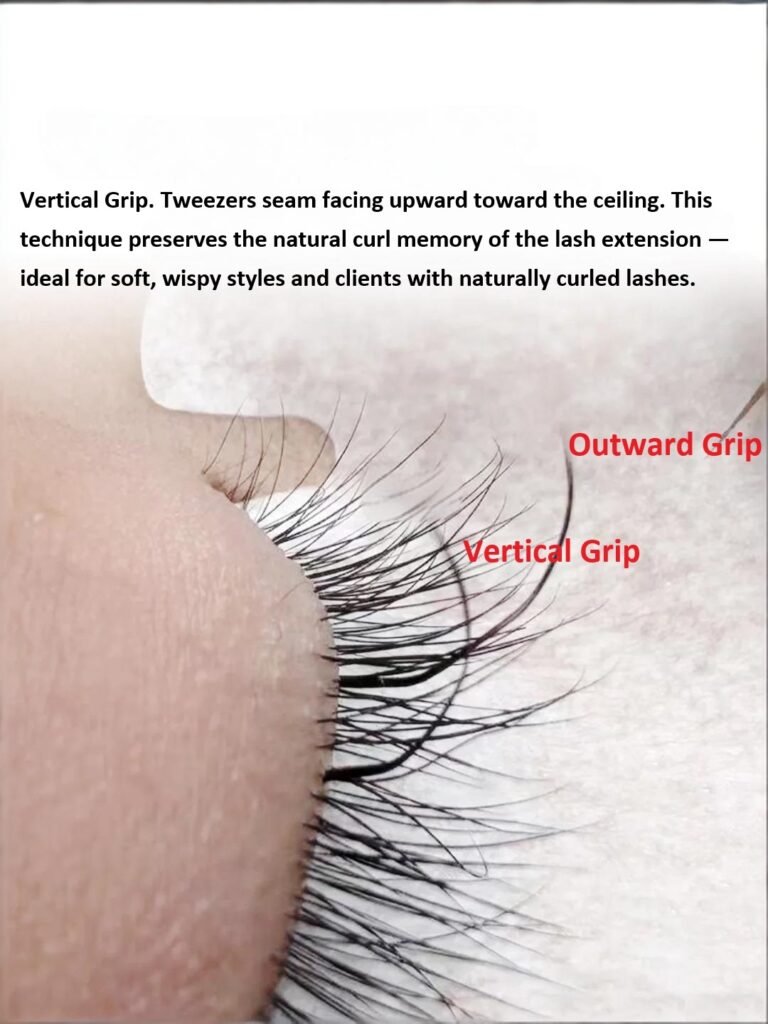
2. Vertical Lash Extension Grip – Soft, Wispy Looks and Natural Curls
Here, the tweezers seam faces straight up toward the ceiling. This upright lash extension grip excels when you want to keep the extension‘s factory curl as intact as possible, making it a perfect match for clients who already have naturally curled lashes or for creating airy, wispy sets where the curl pattern needs to stay bouncy.

Holding the tool vertically with this lash extension grip lets the extension follow the client’s own lash curvature without twisting it to an unnatural angle. As a result, the curl memory of the extension is preserved, giving you that soft, feathered finish. This lash extension grip also pairs beautifully with C-curl and D-curl lashes when your goal is a lifted yet natural look. If you notice the extensions looking a bit too straight after placement, try shifting into the vertical lash extension grip—it can often restore the intended curl orientation instantly. I once had a client with extremely curly natural lashes, and switching to this grip saved the whole set.
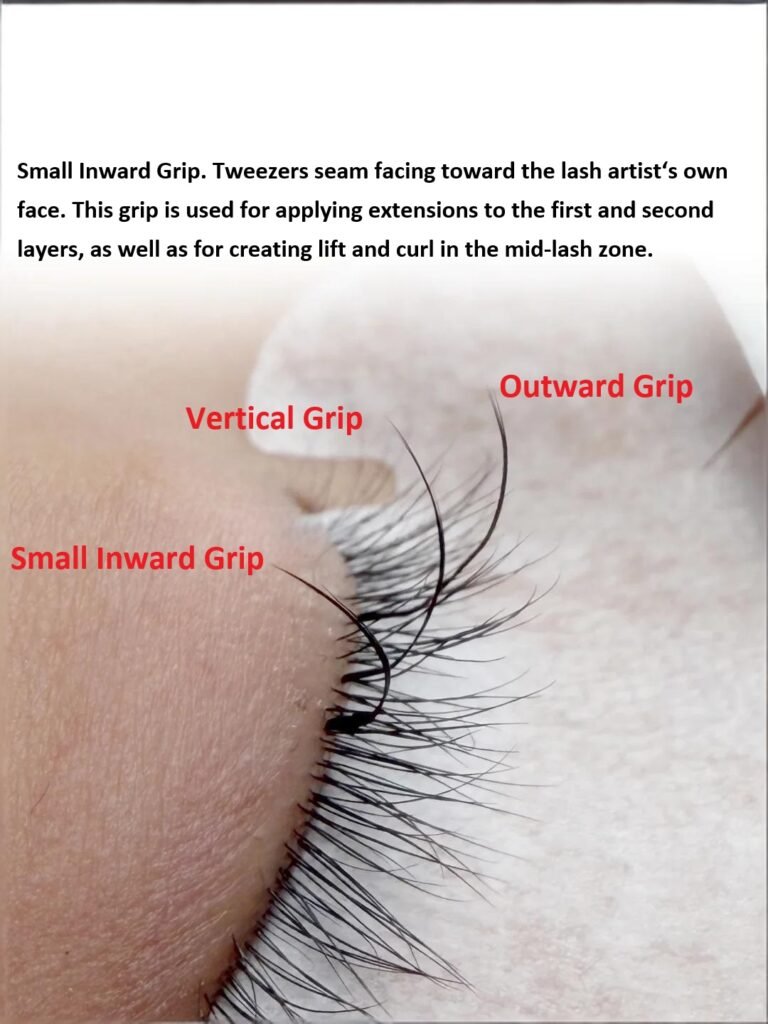
3. Small Inward Lash Extension Grip – The Everyday Workhorse
The most frequently used lash extension grip in classic and volume lashing, the small inward grip turns the tweezers seam toward your own face. This is the position you‘ll likely use for the bulk of a full set—specifically when working on the first and second layers of lashes, and when you want to build lift through the mid-lash zone.
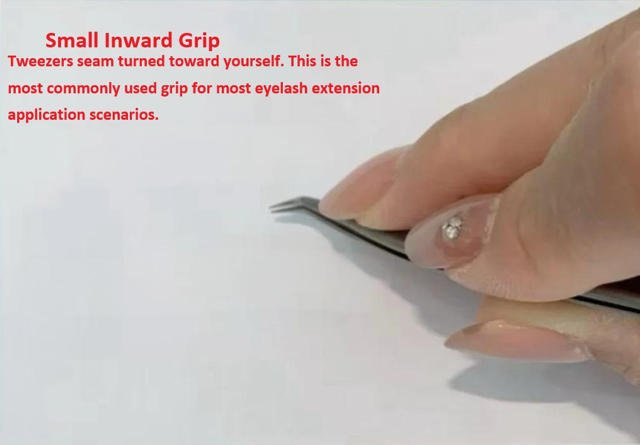
Its popularity comes down to one thing: a natural sightline. With the seam facing you, you can clearly see exactly where the extension’s base is about to touch the natural lash, which helps achieve that 1–2 mm distance from the lash line consistently. Because the wrist remains in a relatively neutral position, this lash extension grip also helps reduce fatigue during longer appointments. For lash trainees, this is usually the first gripping method that feels intuitive, and it‘s a solid foundation for developing speed without sacrificing placement accuracy. In my early days, I used nothing but this lash extension grip for months—it’s that reliable.
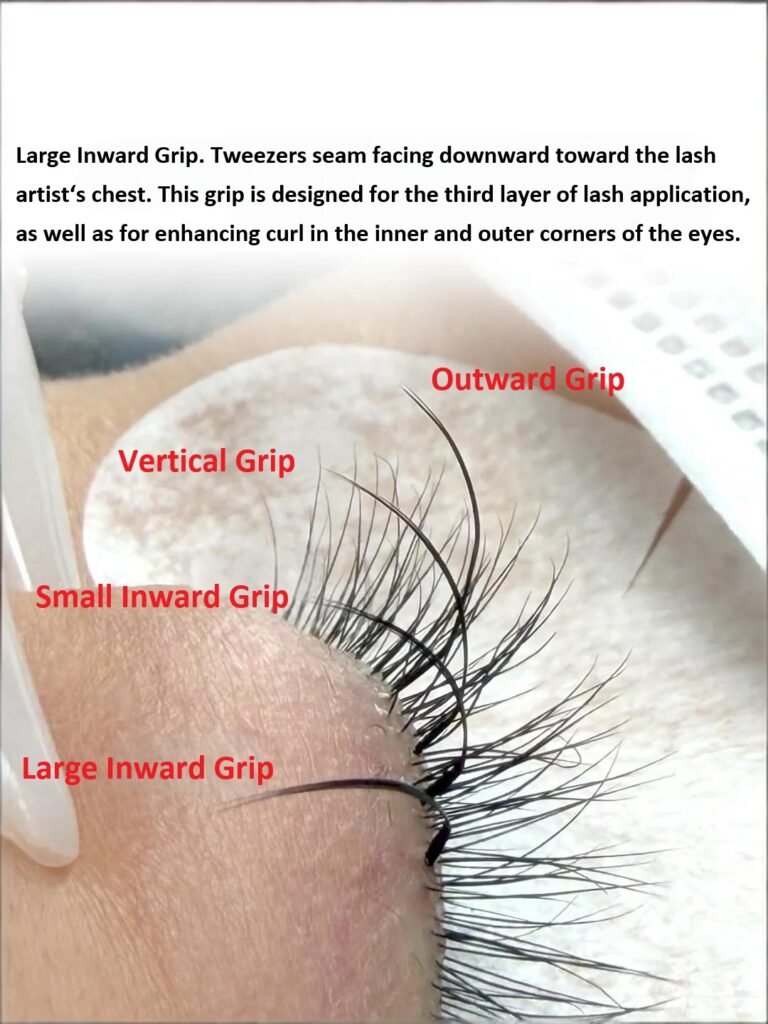
4. Large Inward Lash Extension Grip – Precision for Inner & Outer Corners
In this more advanced lash extension grip, the tweezers seam faces downward toward your chest. You‘ll reach for it when targeting the trickiest areas: the third layer of lashes (the one closest to the eyelid) and the inner and outer corners where lift and direction matter most.
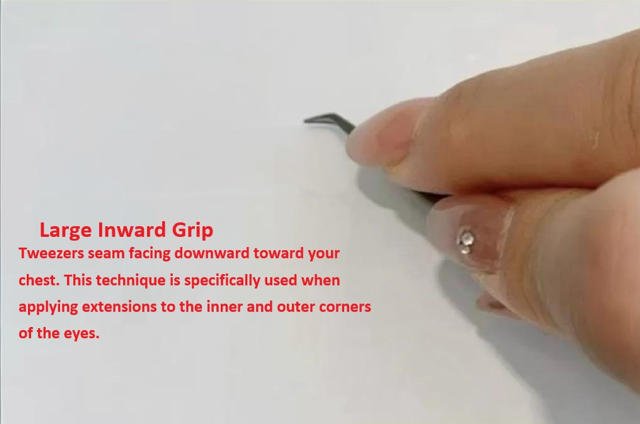
The downward-facing seam positions your hand and tweezers in a way that clears your view of the lash line, so you can place extensions securely without bumping the eyelid. For inner corner work—where lashes tend to point downward or inward—this lash extension grip lets you redirect the extension to open up the eye. Similarly, at the outer corner, it helps achieve that elongated cat-eye flick with real precision. A useful tip I swear by: when working the inner corner with this lash extension grip, try resting your pinky gently on the client’s forehead pad; the extra stability noticeably improves your accuracy.
Choosing the Right Lash Extension Grip for the Right Moment
Knowing each holding style isn‘t enough—you need to know when to switch. Use the outward lash extension grip for lower lash work. Reach for the vertical lash extension grip when you want to preserve a natural curl pattern or deliver an ultra-soft, wispy finish. For the main body of a set across the first two layers, the small inward lash extension grip will be your default. And when it’s time to refine those corners or add volume close to the waterline, the large inward lash extension grip is irreplaceable.
Different lash products also respond slightly differently to these lash extension grips. While strip lashes and cluster lashes have their own application nuances, the same gripping logic applies: adjust your tweezer orientation to match the zone and the base you‘re trying to reach. Experiment on a practice mat or mannequin head with each lash extension grip using your actual lash trays—this builds muscle memory faster than you might expect.
Pro Tips to Refine Your Lash Extension Grips
Stay relaxed. A tense hand transmits tiny shakes to the tweezer tip. Keep your hold firm enough to control the tool, but loose enough that your fingers don’t cramp—this applies to every lash extension grip.
Anchor for stability. Resting your pinky or ring finger on the client‘s forehead pad or your own hand stabilizes the entire lash extension grip, especially during fine corner work.
Practice off the clock. Use a mannequin head to drill lash extension grips transitions until they feel automatic. Try switching from inward to outward grip between layers without looking at your hand.
Invest in quality tweezers. Balanced, well-tensioned tweezers make every lash extension grip feel more controlled and reduce the effort needed to pick up and place extensions.
Record yourself. A short video of your lashing session can reveal micro-adjustments in your tweezer angle that you’d never notice otherwise. Compare your footage against the lash extension grips described above and fine-tune from there.
How Good Lash Extension Grips Benefit Your Business
When you and your team can confidently switch between the right lash extension grips, a few things happen: retention improves, sets look more polished, and clients notice the difference in comfort. This builds trust, encourages rebooking, and generates referrals. For salon owners, incorporating lash extension grips training into onboarding directly reduces redo rates and boosts overall efficiency.
It also positions you as a knowledgeable professional when talking to customers. Whether you‘re explaining the rationale behind a style choice or recommending products, that expertise inspires confidence. As a manufacturer working with salons, retailers, and wholesalers, we share guides like this because we believe that better technique elevates the entire industry. To support your work, we offer a full range of professional products—strip lashes for quick transformations, cluster lashes for customizable volume, and premium individual extensions for classic and volume sets—all designed to perform with the lash extension grips described here. If you’re interested, browse our wholesale lash collection or read our article on Eyelash Extension Theory
Putting It All Together
We‘ve covered the outward lash extension grip for lower lashes, the vertical lash extension grip for curl preservation and wispy styles, the small inward lash extension grip for efficient mid-layer work, and the large inward lash extension grip for precision at the corners and third layer. Each one serves a distinct purpose, and the most adaptable artists are the ones who can flow effortlessly between these lash extension grips.
Instead of aiming for perfection with a single hold, give yourself permission to switch lash extension grips consciously with each section of the lash line. Over time, these shifts will feel like second nature, and you’ll find yourself focusing more on creative design than on how you‘re holding your tweezers. Pair your refined lash extension grips with solid isolation, proper adhesive use, and thorough aftercare guidance, and you’ll deliver sets that consistently exceed client expectations.
Shewincosmetics is a professional false eyelash manufacturer dedicated to sustainable beauty solutions. With more than 10 years of experience and 1000+ customizable designs. Redefine the beauty industry with a partner committed to excellence.
3177 Guhe Street, Ligezhuang Town. Qingdao
bella@shewincosmetic.com
+86 15192708101

Professional eyelash manufacturer. We produce thousands of eyelash products with mink hair, horse hair, synthetic, and other materials. There is always one suitable for your business with factory wholesale prices.
Copyright © 2025 Shewincosmetic