
- Home
- Blog
How to Apply Cluster Lashes for Beginners: A Step-by-Step Tutorial

naturally you
False Eyelash Knowledge Hub
Applying false lashes can feel intimidating, especially if you are new to DIY lash clusters. Fortunately, learning how to apply cluster lashes for beginners is simpler than you might expect. With the right technique and a bit of practice, you can achieve beautiful, natural looking cluster lashes at home without stepping foot in a salon. This guide will walk you through everything from preparing your natural lashes to adding the final touch with eyeliner — and I will also share a few insider tricks for different eye shapes.
Before we dive into the step-by-step process, it is worth noting that cluster lashes offer a fantastic middle ground between single lash extensions and strip lashes. They provide volume and length while remaining lightweight and comfortable to wear. Whether you are looking for everyday glam or something special for an event, mastering how to put on cluster lashes will transform your beauty routine.
What You Will Need to Apply DIY Lash Clusters
Gathering the right tools before you begin is essential for a smooth application. For this lash clusters tutorial, you will need the following:
Cluster lashes (from your lash tray) — Browse our cluster lashes collection
Eyelash curler
Lash primer (optional but recommended)
Precision tweezers (angled tweezers work best)
Applicator stick (also known as a lash applicator or helper tool)
Eyeliner (for finishing touches)
Pro tip: Self adhesive eyelash clusters come pre-coated with adhesive on the lash band, making them particularly beginner-friendly since you can skip the step of applying separate glue. If you ever need extra hold, check out “The Ultimate Guide to Choosing the Best Lash Extension Glue for Sensitive Eyes”
Step-by-Step: How to Apply Cluster Lashes for Beginners
Step 1: Clean Your Eyelids Thoroughly
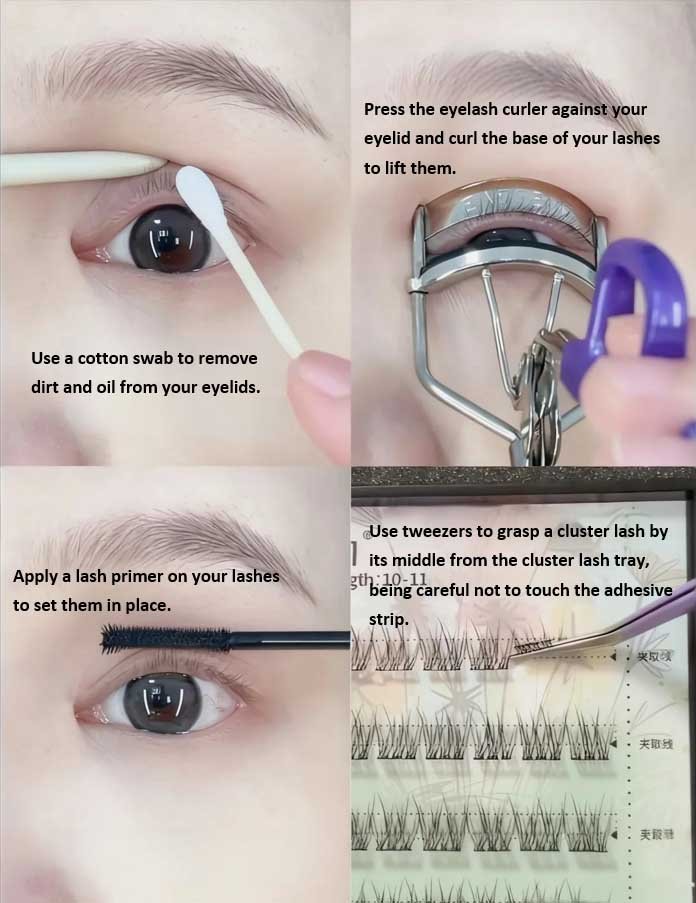
Use a cotton swab to remove any dirt, oil, or makeup residue from your eyelids. This preparatory step is crucial because any remaining oil can prevent the adhesive from bonding effectively to your natural lashes. Clean lashes mean better adhesion and longer wear.
Step 2: Curl Your Natural Lashes
Press your eyelash curler firmly against your eyelid and curl the base of your natural lashes to give them a nice lift. This step helps your DIY eyelash clusters blend seamlessly with your natural lashes. For best results, hold the curler for five to ten seconds at the root. (If you have stubborn straight lashes, warm the curler slightly with a hairdryer for a few seconds — but always test the temperature on your hand first.)
Step 3: Apply Lash Primer for Extra Hold
Brush a thin layer of lash primer onto your natural lashes and allow it to set for a moment. Primer acts as a base coat, creating a slightly tacky surface that helps the lash cluster adhesive grip more securely. If you are using self adhesive eyelash clusters, this step is optional but still beneficial — especially on humid days.
Step 4: Pick Up a Cluster Lash Correctly
Using your tweezers, grasp a cluster lash firmly by its middle section from the cluster lash tray. Be careful not to touch the adhesive strip with your fingers, as natural oils from your skin can reduce stickiness. Picking from the middle—rather than the ends—gives you better control and prevents the lash from bending or deforming.
Step 5: Expose Your Lash Line
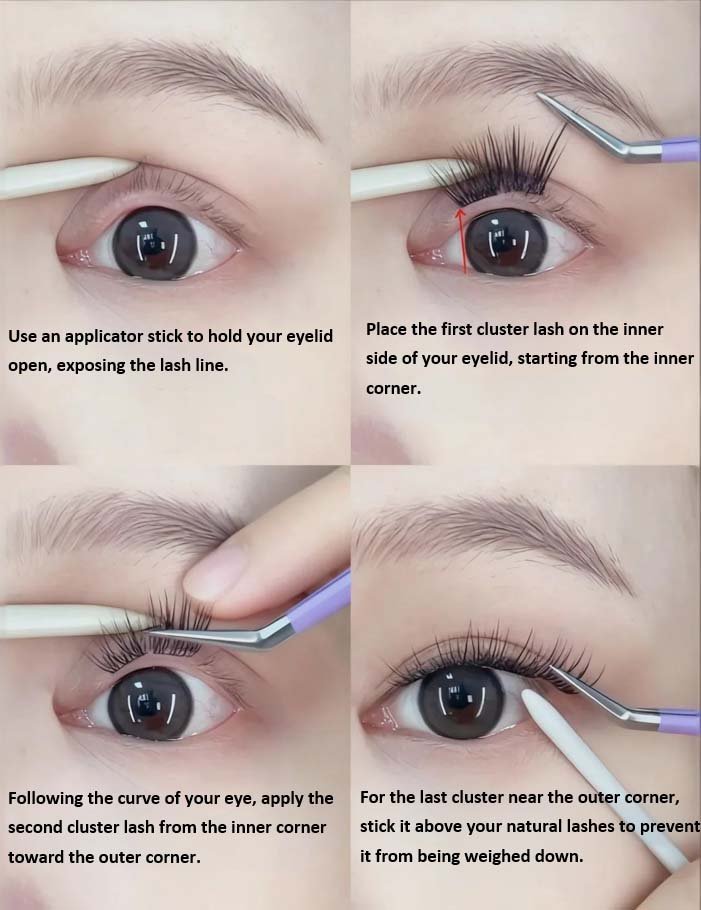
Take your applicator stick (also called a helper tool or lash applicator) and gently lift your eyelid to expose your natural lash line. Looking slightly downward into a mirror can help you see your lash roots more clearly. This positioning is a key technique in how to apply cluster lashes for beginners because it allows for precise placement.
Step 6: Place the First Cluster from the Inner Corner
Starting at the inner corner of your eye, place the first lash cluster on the underside of your natural lashes, as close to the lash line as possible without touching the eyelid skin. The inner corner is the best starting point because it allows you to work outward systematically.
🔍 For hooded or monolid eyes: Place the inner‑corner cluster slightly higher (about 0.5mm above the natural lash line) so it does not poke the crease when you open your eyes.
Step 7: Continue Along the Eye Curve
Following the natural curve of your eye, continue applying additional cluster lashes from the inner corner toward the outer corner. Overlap each new cluster slightly with the previous one to create a seamless, continuous look. For a natural looking cluster lashes effect, use shorter clusters near the inner corner and gradually increase length as you move outward.
Step 8: Secure the Outer Corner Cluster
The last cluster lash near your outer corner requires special attention. Place it above your natural lashes rather than underneath. This technique prevents the outer corner cluster from being weighed down by blinking and natural eye movement, helping your lashes stay lifted all day. For downturned or round eyes, you can angle this outer cluster slightly upward to create a subtle cat‑eye lift.
Step 9: Blend with Eyeliner
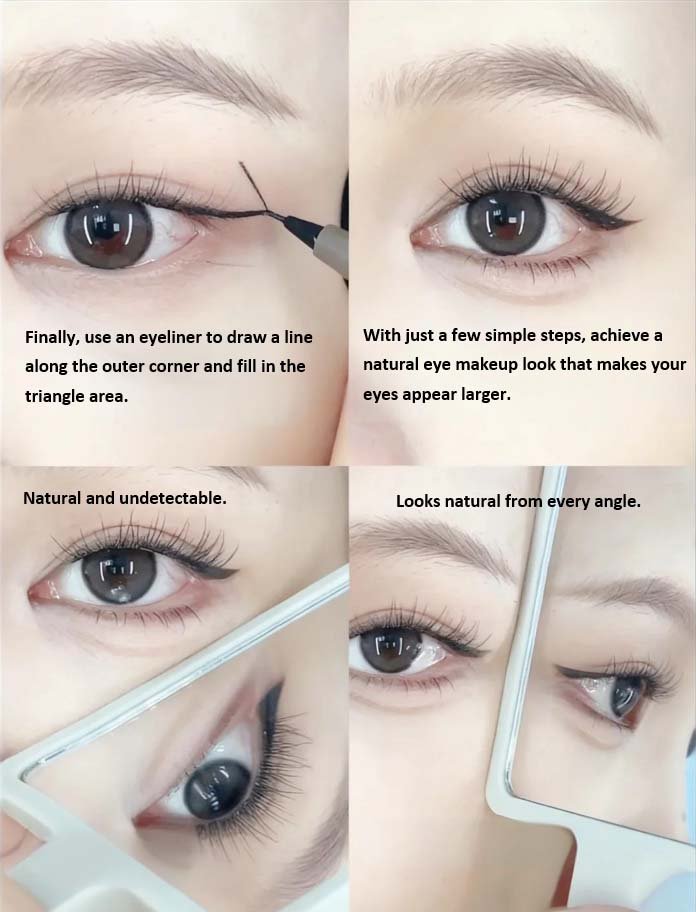
Finally, use a fine-tipped eyeliner to draw a line along your upper lash line, filling in any small gaps between clusters. Pay special attention to the outer corner triangle area. This finishing touch conceals the lash bands and makes your DIY lash clusters look completely natural.
Tips for a Natural Finish
When learning how to apply eyelash clusters step by step, many beginners wonder how to avoid an overly dramatic or artificial look. Here are several effective strategies:
Vary your cluster lengths. Use shorter clusters near the inner corner and longer ones toward the outer edge to mimic natural lash growth.
Leave small gaps. Do not place clusters side by side with zero space in between—a millimeter or two of breathing room prevents clumping.
Stagger placement. Avoid lining up clusters in a perfectly straight row for a more organic appearance.
Check from every angle. After finishing, look at your lashes from the side. Natural looking cluster lashes should appear seamless with your natural lash line.
Common Mistakes to Avoid (And How to Fix Them)
Here are some pitfalls to watch out for when following any lash clusters tutorial — plus quick fixes if they happen to you.
| Mistake | Why It Happens | Quick Fix |
|---|---|---|
| Clusters stick to your eyelid skin instead of lashes | You placed them too high. | Gently wiggle the cluster off with tweezers and reposition it directly onto your natural lashes. |
| Outer corner keeps falling off | You placed the last cluster underneath instead of above. | Reapply the outer‑most cluster on top of your natural lashes, as described in Step 8. |
| Visible gap between clusters | You did not overlap enough. | Add one more small cluster in the gap, overlapping both edges. |
| Clusters feel heavy or poke your eye | You picked a length that is too long for your eye shape. | Trim a few hairs off the longest cluster with small scissors before applying. |
How Long Do DIY Lash Clusters Last?
With proper application, DIY lash clusters can last anywhere from three to seven days, depending on your daily activities and how well you care for them. Avoiding oil‑based cleansers and excessive rubbing will extend wear significantly. For removal, use a gentle lash adhesive remover rather than pulling, which can damage your natural lashes.
Frequently Asked Questions (FAQ)
Can I reuse cluster lashes after they fall off?
Yes, if the adhesive strip is not covered in old glue. Gently peel off any residue with tweezers, then dip the base into fresh adhesive (if using non‑self‑adhesive clusters). For self‑adhesive clusters, reuse is usually not recommended because the original stickiness fades.
Will wearing cluster lashes ruin my natural lashes?
No, as long as you remove them correctly. Never pull them off dry. Always use an oil‑free remover or a dedicated lash adhesive solvent, and let the clusters slide off naturally. Ripping them out can cause breakage.
Which cluster length is best for beginners?
Start with a mix of 8mm, 10mm, and 12mm. Use 8mm for the inner corner, 10mm for the middle, and 12mm only for the outer corner. Avoid 14mm or longer until you are comfortable with placement.
Can I sleep while wearing cluster lashes?
It is not recommended. Sleeping on your side or stomach can crush the clusters and lead to premature loosening. Remove them before bed for best results. </details>
Final Thoughts
Mastering how to apply cluster lashes for beginners opens up a world of possibilities for customizing your eye makeup looks. With just a few simple steps—clean, curl, prime, place, and line—you can achieve a natural eye makeup look that makes your eyes appear larger without the time and expense of professional lash extensions. The beauty of DIY eyelash clusters lies in their versatility; you can go subtle for daytime or build volume for evening glamour.
Natural and undetectable. It also looks natural from the side. With practice, you will wonder why you did not start wearing cluster lashes sooner.
👉 Looking for more lash education? Visit our “DIY Cluster Lashes Guide: A Safe & Beginner-Friendly Step-by-Step Tutorial” for articles on cluster lash care, eyeliner techniques for lash wearers, and troubleshooting lifting corners.
Shewincosmetics is a professional false eyelash manufacturer dedicated to sustainable beauty solutions. With more than 10 years of experience and 1000+ customizable designs. Redefine the beauty industry with a partner committed to excellence.
3177 Guhe Street, Ligezhuang Town. Qingdao
bella@shewincosmetic.com
+86 15192708101

Professional eyelash manufacturer. We produce thousands of eyelash products with mink hair, horse hair, synthetic, and other materials. There is always one suitable for your business with factory wholesale prices.
Copyright © 2025 Shewincosmetic